Hisao Oono Garland in Action
Mr. Oono's Twill Garlands[]

A garland made by Edward Spiegel after Hisao Oono's design.
Mr. Hisao Oono of Japan has developed an elegant tangle-resistant garland design that is also incredibly easy to make using cotton twill (cotton cloth "tape") and fabric glue (or hot-melt glue).
He has posted step-by-step guide to constructing his garlands. The guide about it is in Japanese, but the pictures speak for themselves. Visit his blog entry. See the Bing-translated version here.
When you make your own wand, you can make looplets of whatever size you would like. Keep in mind that the smaller the looplets are, the more wind that is needed to create bubbles. Looplets that are 4-1/2"-6" for the top-section (and about 2 to 2.5 times that long for the bottom section) work well in a wide range of conditions. Smaller looplets are great on very windy days when nothing else will work..
Specifications of Mr. Oono's Design[]
Below are the measurements of the garland that Mr. Oono documents in his tutorial (translation here).
Mr. Oono uses cotton tape (also known as cotton twill or twill tape) 10 mm wide (3/8" wide tape) and fabric glue.
A picture of the basic layout is here.
For each looplet, the bottom length of tape is 25 cm (9-3/4").
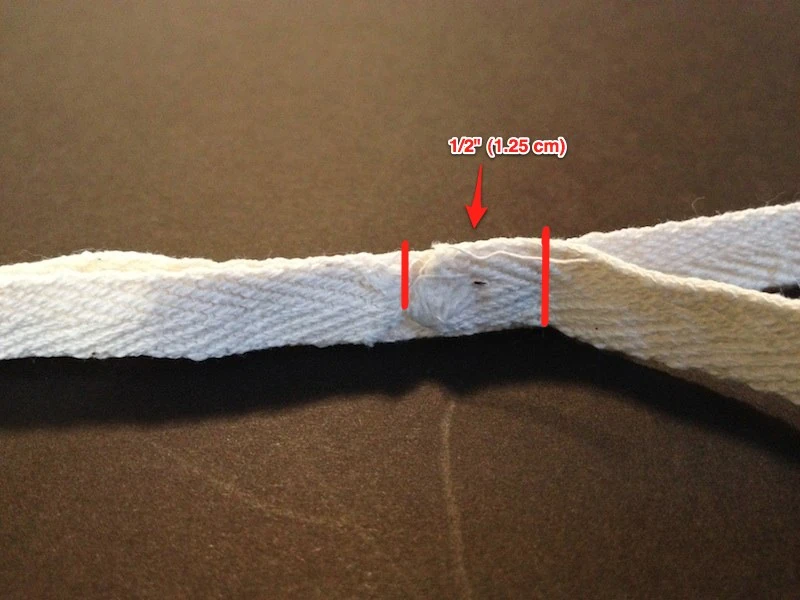
The top length is 11 cm (4-1/3") with 3 cm (1.1") between looplets.
His preferred garland has 10 looplets and for the top-string uses one continuous 157 cm (62") strip of the cotton tape.
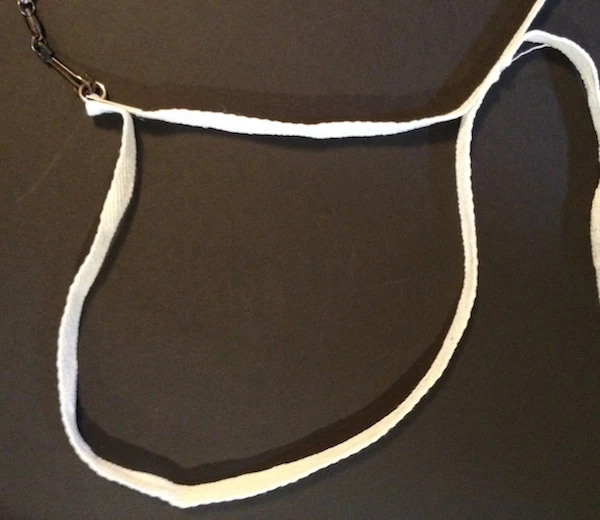
At the ends, he uses a sort of clamp that you can see here which he gets from a keychain fob as shown.
Be sure to use high-quality fabric glue. High-quality fabric glue will not weaken even with extended soaking or even machine washing. Some glues are even labeled as machine-washable. Hot-melt glue will also work though some hot-melt glue works better than others.
Sewing. And, of course, you can sew the pieces together rather than use fabric glue.
An Example[]

2014 04 Bubble Garland - No Wind - Demo 1
This is Edward's first attempt at an Oono-style garland made with heavyweight 3/8" cotton twill tape. Fabri-tac fabric glue was used. This glue takes 24 hours to fully dry and cure. Once it is cured, it holds up well. Even 48 hours soaking in bubble juice did not weaken the glue. Hot-melt glue is even better if you have a glue gun handy as your garland will be ready in minutes.
See a related blog entry here about a small looplet garland that can fill the air with small bubbles on a windy day.
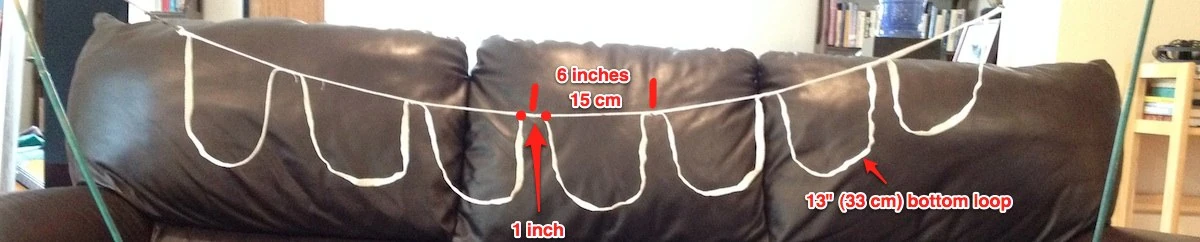
The top of the garland was marked every 6". 1/2" of each looplet's bottom string is used to attach it to the top-string. This creates looplets with a 5-1/2" top spaced 1" apart.

Glue gun. If you have a hot-melt glue gun (cheap mini glue guns work great), use it. It takes only a few minutes to make a garland using a glue gun. And it is ready to go after just a few minutes. If using a glue gun, make sure that your glue sticks are labeled as working for fabric. Most all-purpose glue sticks work well for this purpose.

Related Information[]
Thanks go to Bubble artist Ben Jimenez for bringing to our attention that cotton tape similar to what Mr. Oono uses can be found in the U.S. as cotton twill tape.
UPDATE (April 2, 2014): Mr. Jimenez has updated his garland thoughts on SBF. In summary: he finds that 7/16" twill tape is working best for him. Loops made with wider tape become very heavy. Narrower tape is more prone to folding-over. He cuts 10.5" lengths that he sews into a loop with a swivel on either side of the 'top'. He notes that he hand sews one loop as an example and has an alterations/dry-cleaners sew the other lengths into loops.
Some preliminary tests at the wiki indicate that while 1/4" twill tape could create quite a few bubbles per dip, it was a more prone to tangling than heavyweight 3/8" twill. We have not yet compared the 3/8" heavyweight twill to the "standard weight" 3/8" twill. All of them worked quite well and were tangle resistant. This design is also quite quick to make when using fabric glue or a hot-melt glue gun.
Sources. Fabric stores often carry twil in packages that contain several yards/meters. Online sources often have it in larger spools at much lower prices per length than fabric stores. You can see examples of cotton twill tape here at RibbonFactory.com. Twilltape.com is another source of cotton twill tape..
Twill packaging note! Pay close attention to the packaging. A close inspection of cotton twill tape packages at a local fabric store revealed several whose packaging had "Cotton Twill Tape" in large letters but that were 70% to 100% polyester! (You read that right, there was at least one packag labeled Cotton Twill tape that was 100% polyester).
Glue. Not all fabric glues are equally suited to this use. The glue that I used has held up to much abuse and remained fast. People have reported that some fabric glues will not hold after extended soaking. Hot-melt glue works very well and is ready to go in minutes.
Additional Notes[]
When using lightweight twill. Edward Spiegel reports that lightweight twill (such as 1/4"-wide tape) has a tendency to foldover with larger size looplets (let's say 4" top or larger) but works great for small looplets (3" top). The small looplets require a fair amount of wind. With larger loops (and lightweight twill)), the tendency for the loops to tangle/fold over can be reduced by making the bottom segments 3 times the length of the top. He also notes that with this design swivels on the leads may increase the likelihood of tangling. Ben Jimenez makes individual twill loops and rather than connecting them to a top-string, he links them with fishing swivels made by Eagle Claw. He uses the snap-swivel style which has one safety-pin like side which he pokes through the twill. This setup allows each looplet to spin independently. See his SBF post.
Edward's Variant[]
Inspired by Mr. Oono's design and Ben Jimenez reports, Edward started making his garlands using Mr. Oono's method but substituting hot-melt glue for fabric glue. High-quality hot-melt glue seems to be at least as durable as high-quality fabric glue and has the advantage of being ready to use in minutes.
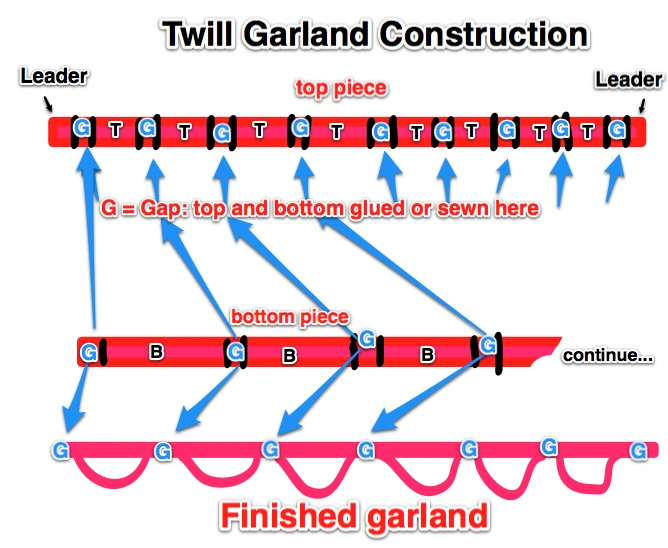
Construction[]
The diagram below shows the basic design. In the diagram 'G' is the gap width. This is the space between looplets. 'Leader' is some extra fabric used to make a leader that you use to attach to your wand. For the top piece, the space between the gaps (G) is your looplet size. Let's call that T (for top). For the small looplet garland, I used T= 3". B is the space between gaps for the bottom part of the looplet. I like to have the looplet bottom be twice the length of the top. So, for the small-looplet garland, I use 6" for B.
Calculating the material[]
Here are the formulas for determining how much material you need to construct a garland with the basic design showed above.
L= leader length; G= Gap between loops; T= looplet top-string length; N = number of loops, B=bottom looplet length
Top length = 2L + ((N+1)*G) + NT Bottom length: = ((N+1)*G) + NB
Example[]
Here are the calculations for a garland with 12 3" looplets (whose bottoms are 6" long) and a 1" gap and a one inch of leader N = 12; G = 1"; L = 1"; T = 3"; B = 6"
Length of top piece = (2*1) + ((12+1) * 1) + 12*3 = 2 + 13 + 36 = 51"
Length of bottom piece = (13 * 1) + 12*6 = 13 + 72 = 85"