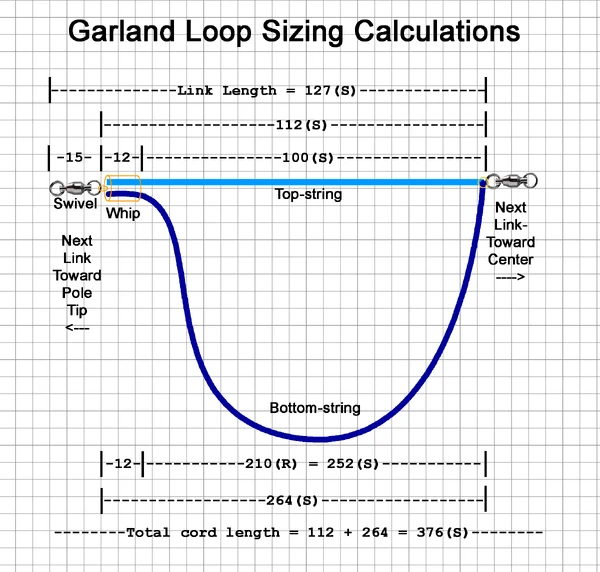
Garland Loop Sizing Calculations[]
When I built my first bubbling garland, I was very careful that the loops' bottoms were exactly twice as long as their tops. I pre-treated my cord so I wouldn't get surprise shrinkage, and I accounted for my connection method in all measurements. It worked OK but after only a few sessions, I noticed the top:bottom ratio was nowhere near what I had aimed for. The tops got longer and the bottoms shrunk.
Here I describe how to some ways to avoid this problem.
Stretch Testing[]
When you use a garland, its tops are always stretched but its bottoms never are. You need to know how much you can expect your cord material to stretch. For this, I stick a tape measure to the wall, hold one end of a cord firmly at the tape's start, grab the cord at the 50 cm point with my other hand, and see how much I can stretch it out. I sample at least 4 pieces this way. For example, I might get measurements of 60, 62, 59, and 60. This would tell me I can expect the cord to stretch to about 20% more than its relaxed length. You need to account for this in a garland's construction.
Bigger Bottoms Are Better[]
You can minimize fold-overs on a garland by making their bottom strings a bit more than 2 times the length of their tops. The degree to which you go beyond the "bottom = 2x top" rule depends on the material and the size of the loops. In the example that follows, I use a bottom = 2.1x top rule. The bottom is 210% longer than the top.
Loop Calculations[]
The following diagram describes construction of a loop for a 100 mm garland. When I talk about a "100 mm" garland, I mean the inside measurement of its top-strings are 100 mm when stretched. Calculations are for a material that stretches 20% from its relaxed state and for a target top:bottom ratio of 1:2.1. "(S)" indicates "stretched". "(R)" means relaxed". The top- and bottom-strings are both part of a single length of cord. They're colored differently only for illustration purposes. The portions of the cord within the whipping are essentially stretched to the max.

Total Garland Length Calculations[]
The total length of a link in this garland is 127 mm. Let's assume you'd like the total length of your garland to be 3 meters, not including leaders and other attachments. You could estimate how many loops would fit using this calculation ...
3000 / 127 = 23.6
So, you could fit 23 or 24 loops, right? Well no, it's not quite so simple. With the loop design illustrated here, you gain a big advantage by having the pinched cord connections (on the left) pointing up as you're lifting the garland from the juice, and the splayed connections (on the right) pointing down. This reduces your garland's vulnerability to early blow-outs as you're lifting it from the juice. You want the left and right halves to be mirror images of each other.
At the Garland's Center[]
The smallest ball-bearing swivel (#0) is about 15 mm long. Combined with a whipped connection, it's at least 25 mm between loops, enough to keep a garland's bubble streams from joining together. But at center of this garland's 2 halves, designed as described here, the 2 loops at its center "lean" toward each other. Their bubble streams tend to join together, creating bubbles larger than all the rest and blowing out earlier than the other cells. For this reason it's good to add some extra spacing at the garland's center, using extra knots, swivels, split rings, etc.

Garland center connection
Other Considerations[]
The bottom-strings of hand-braided materials tend to shrink more than diamond braid or other types of cords. The more strands, the more shrinkage over time.
Loops with braided cords have top and bottom sides. It's necessary to check once in a while to see if one has been turned inside-out.
When using "standard" whippings, occasionally roll and pack them between between your fingers during your garland's break-in period to bring the cord tips inside of the whipping. With "West country" whippings, make sure to leave enough extra "ears" on the final knot to allow for slippage that happens before these tails expand and lock the knots.
Cover whippings with fabric paint or hot glue to reduce their chances of unraveling.
Use only corrosion-resistant ball-bearing swivels between connections. DO NOT use brass barrel swivels. They will soon stop swiveling, discolor, corrode, and wear through connections to fabric.
If your garland's bubble streams often join together, try a mix with less polymer (PEO, HEC, guar, etc). Smaller loops perform better with more detergent and glycerin.